6.2. Working with Pull Requests
We are using GitHub’s pull requests (PRs) feature to integrate changes into
mirgecom and its supporting packages. Pull requests are based on git branches
that are merged into another branch (usually the main branch). Note that
pull requests are a GitHub feature and live outside the main git
functionality; the git program itself has no knowledge of them.
Note
A good overview of basic git functionality and the git program can be found
on this GitHub page.
Note
On most systems, the git program will already be installed. You can
install it yourself by running conda install git.
6.2.1. Forking the repository
In most cases, it will be necessary to fork the repository (that is, create a copy of the repository in your own GitHub account), since creating a pull request requires creating a branch in the repo, which requires write access. You can fork a repository directly on the GitHub website. You can add the URL of the fork to your local cloned copy of the repository with the following command:
$ git remote add my_fork git@github.com:MYUSERNAME/REPONAME
6.2.2. Creating a new pull request
Create a new branch for your pull request:
$ cd mirgecom           # or loopy, meshmode, ...
$ git switch -c featureX   # Create new branch for your feature and switch to it
# Edit files
Check that your changes pass tests:
# Install these with 'pip install wheel flake8 pep8-naming flake8-quotes pytest pylint' if needed
# (emirge will have installed them for you automatically)
$ flake8 mirgecom test
$ pydocstyle mirgecom test
$ (cd test && python -m pytest)
Commit your changes to the new branch:
$ git add file1.py file2.py
$ git commit
Push your changes:
$ git push -u my_fork featureX
Create pull request:
https://github.com/illinois-ceesd/mirgecom/pulls
The
basebranch should be themainbranch of the repo you want to merge into in most cases. Thecomparebranch is the branch with your changes.After the pull request has been merged, please delete the branch (locally and remotely):
$ git branch -d featureX    # delete branch locally
$ git push –delete featureX # delete it remotely; or delete in web interface
6.2.3. Updating a pull request
Commit to the same local branch and push that branch:
$ git commit
$ git push
When changing the history of a branch (e.g., by rebasing the branch, or
by amending a commit that is already pushed), you might need to
force-push it back to the repository (i.e, git push --force). Please
use this sparingly.
6.2.4. Dependent pull requests
It is likely that you will need to propose changes to supporting packages (e.g. grudge, meshmode, loopy, pyopencl) in order to implement a feature in mirgecom, thus creating a mirgecom PR that depends on a PR in the other package. In a situation where both PRs are under review at the same time, mirgecom has a way to express this dependency to make it easier to review and test both PRs jointly.
You can express this dependency by modifying the branch of a dependent package
inside mirgecom’s requirements.txt file in the main mirgecom folder. In
the following example, assume that we want to create a feature in mirgecom
that depends on the featureX branch in meshmode:
git+https://github.com/inducer/meshmode.git#egg=meshmode
# change to:
git+https://github.com/MYUSERNAME/meshmode.git@featureX#egg=meshmode
With this change, new emirge installations and continuous integration tests will
automatically use the featureX branch of meshmode.
Important
You will need to merge the dependent PR first (ie., meshmode in the above
example), then restore the original requirements.txt of mirgecom, and
then merge the mirgecom PR.
6.2.5. Reviewing & PRs
Each pull request for mirgecom needs one manual approval by a reviewer and needs to pass the Continuous Integration (CI) tests before merging. For the manual reviews, please select at least one reviewer (someone that has knowledge about the code you are modifying) in the “Reviewers” box at the top right of a PR. You can set the PR as a “draft” PR to indicate that it is still in progress and only a high-level review is requested.
Note
Some thoughts and best practices regarding submitting your code for review can be found in this article:
A similar (but mirrored) set of concerns applies from the other direction. You will definitely want to read these articles when you start reviewing other folks’ code, but it may be helpful to read them even before then to gain a better understanding of the process:
Arguably one of the most important considerations for creating, maintaining and reviewing PRs is the size of the PR. In general, developers should strive to keep them small. Try to break large feature developments into smaller, more manageable pieces. Small PRs are far easier to understand, review, and identify potential defects. Your feature(s) will merge much faster and cleaner if the PRs are kept small.
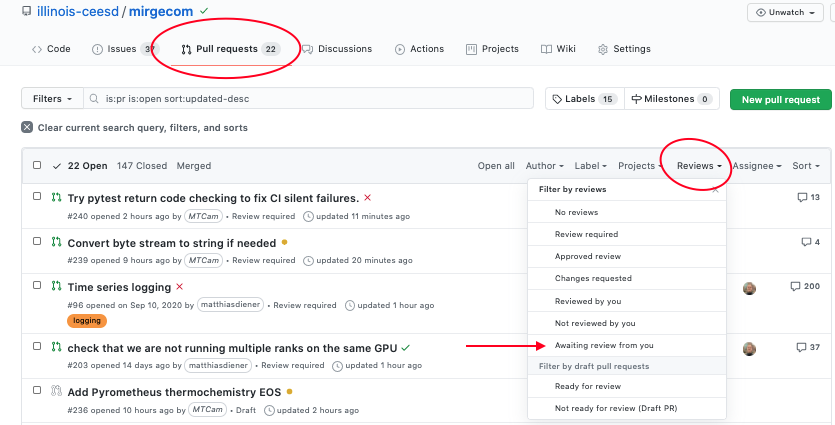
We often use inter-developer peer review for PRs. Flag your peers as reviewers for your work. More eyes on our developments result in higher quality, more robust software. As a part of the development team, it is important for you to keep up with your PRs, and the PRs of your peers who have requested your attention. The Github web interface can let you know when someone has requested your review.
6.2.6. Continuous Integration Testing (CI)
We use GitHub actions as the CI provider to test each pull request. The CI
tests are triggered automatically when a pull request is created or updated.
The CI tests comprise style-related tests to see if the PR conforms to our
coding guidelines (using the flake8, pylint, and pydocstyle
packages), as well as functional tests using the pytest package. When a
test fails, please take a look at the CI outputs to fix the error. Both draft
PRs and full PRs will undergo CI tests.
To check the code automatically on your local machine before creating the git
commit, you can use a git hook such as the following one (save this script as
.git/hooks/pre-commit in the mirgecom/ folder and make it executable):
#!/bin/bash

if [[ $(command -v "flake8") ]]; then
    flake8 mirgecom/ test/ examples/ setup.py doc/conf.py
    res=$?
    if [[ $res -ne 0 ]]; then
        echo "Error: flake8 check failed. Fix the errors (or run git with --no-verify to bypass the check)."
        exit $res
    fi
else
    echo "Warning: flake8 not found. Run 'pip install flake8' to install it."
fi


if [[ $(command -v "pydocstyle") ]]; then
    pydocstyle mirgecom/
    res=$?
    if [[ $res -ne 0 ]]; then
        echo "Error: pydocstyle check failed. Fix the errors (or run git with --no-verify to bypass the check)."
        exit $res
    fi
else
    echo "Warning: pydocstyle not found. Run 'pip install pydocstyle' to install it."
fi
While highly recommended, hooks can sometimes be annoying. After setting up your hooks, you can use git --no-verify or equivalently git -n to run git commands without triggering the hooks.
6.2.7. Production Testing in CI
The CI testing in mirgecom includes a set of “production” tests which help detect when a proposed change in a PR breaks the CEESD prediction capability toolchain. Most developments and PRs do not require special considerations for the production tests, but any production test failures will require a bit of care to resolve.
When PRs run afoul of the CI production tests, it indicates that if the PR change set merges to main, then the “production” capability of mirgecom will not function until the production capability and the change set are brought into accordance.
To resolve CI production test failures for a development in PR, it is often useful
to run the production tests manually. The production tests may be prepared and
executed from anywhere by hand-executing the production test scripts found in
scripts/. Here is a quick-start summary of the commands needed to run
the production tests. These should be run from the top-level mirgecom source
directory:
$ . scripts/production-testing-env.sh
$ . scripts/merge-install-production-branch.sh
$ . scripts/install-production-drivers.sh
$ . scripts/run-driver-smoke-tests.sh
The following is step-by-step example procedure adjacent to what CI itself does for executing the production tests.
Check out the PR development (and optionally make a production branch)
The PR development is assumed to be in a mirgecom branch called
branch-nameand possibly in a fork calledfork-name.$ # For ceesd-local branches: $ git clone -b branch-name git@github.com:/illinois-ceesd/mirgecom $ # Or for developer fork: $ git clone -b branch-name git@github.com:/fork-name/mirgecom $ cd mirgecom # or loopy, meshmode, ... $ git checkout -b branch-name-production # Optional production branch
Set up the production environment and capability
$ # Load the customizable production environment
$ . scripts/production-testing-env.sh
$ # Merge the production branch
$ . scripts/merge-install-production-branch.sh
If Step 2 succeeds, then your development does not need a custom production branch to pass production CI. Proceed to Step 3.
If Step 2 fails, i.e. if there are merge conflicts, then those must be resolved. Resolve the conflicts by-hand in the usual way. Once the conflicts are resolved, then proceed to Step 3, and iterate as needed until Step 3 passes. Your development will require production environment customization. After Step 3 passes, Push the conflict-resolved merged result to CEESD or a fork as shown in Step 4, and indicate that version in the PRODUCTION_FORK, and PRODUCTION_BRANCH env vars in
scripts/production-testing-env.shas shown in Step 5.Grab and run the production tests
$ # Load env if needed
$ . scripts/production-testing-env.sh
$ # Get the production tests
$ . scripts/install-production-drivers.sh
$ # Run the production tests
$ . scripts/run-driver-smoke-tests.sh
Step 3 will clone the production driver repos to the current directory, with each driver in its own directory. If any of the drivers fail to work with the current development, then they may be modified into working condition and then pushed to a repo/branch. Indicate the location of the working drivers in the PRODUCTION_DRIVERS env var customization in
scripts/production-testing-env.sh.Push your updated “production” branch to the repo (or to your fork):
$ git push -u origin branch-name-production
$ # Switch back to your development branch
$ git checkout branch-name
Update the PR to reflect the change in production environment (if any)
Push the customized production
scripts/production-testing-env.shsettings to the PR development branch. For example, set:$ PRODUCTION_BRANCH="branch-name-production"
Upon push, mirgecom CI will try the production tests again, now with the customized environment.
If the PR development requires production environment customization in order to pass production tests, then care and coordination will be required to get these changes merged into the main mirgecom development. PR reviewers will help with this process. If the PR is accepted for merging to main, then mirgecom developers will update the production capabilities to be compatible with the changes before merging.
Important
Any production environment customizations must be backed out before merging the PR development to main. Never merge a PR development with production environment customizations in-place.
6.2.8. Merging a pull request
There are three ways of merging a pull request in the web interface: squash and merge, rebase and merge, and create a merge commit.
6.2.8.1. Squash and merge
Squash all commits into one commit and merge it to the main branch. This is
the preferred option, especially for small changes, as it keeps the history
shorter and cleaner, makes git bisection easier, and makes it easier to revert
a pull request.
6.2.8.2. Rebase and merge
Rebase all commits to top of the main branch and merge all commits. This
is the preferred option for larger changes, for example, by having
separate commits for the implementation of a feature and its
documentation
Other possibilities (such as squashing only some commits and then
merging multiple commits into main) are not directly supported by
GitHub’s Web UI, but can be done manually on the command line (these
might need to be force pushed to a branch).
6.2.8.3. Create a merge commit
This options just merges all commits into the main branch. This is the simplest
way to merge a pull request, but can lead to issues with bisection and reverting PRs
later.
6.2.9. Tools
Apart from the git tool, there are other tools that help to simplify various
aspects of working with GitHub:
6.2.9.1. Command line
6.2.9.2. GUI
Fork (Mac, Windows)
GitHub Desktop (Mac, Windows)
Sublime Merge (Linux, Mac, Windows)
Magit (Emacs)